|
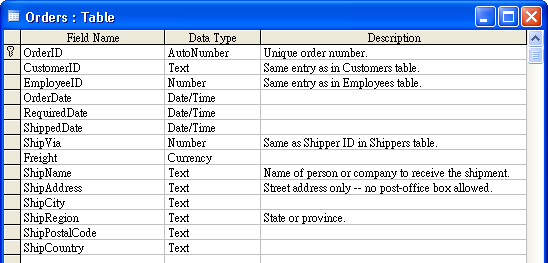
Tutorial - Master/Detail In this tutorial we will show you how to setup Master/Detail table view in ASPMaker. We will use the demo database for demonstration. The demo database is a modified version of the Access demo database Northwind.mdb for better illustration. In the demo.mdb, there are two tables called "Orders" and "Order Details". We will set up the master/detail relation between these two tables. Fields in Table "Orders"
Fields in Table "Order Details"
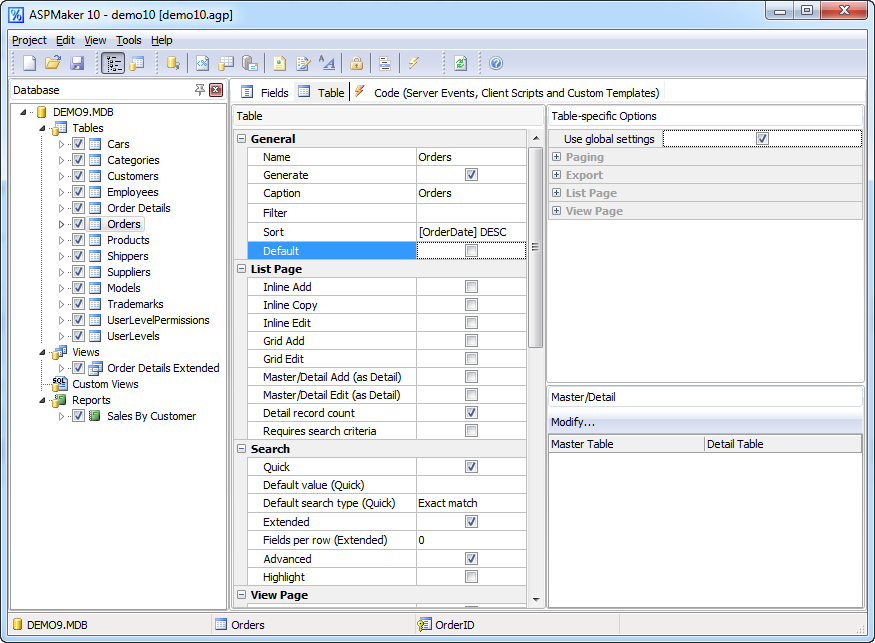
Steps to Setup Master/Detail Records 1. Loading ASPMaker Open ASPMaker and connect to the demo.mdb database. 2. Setting up Master/Detail Relationship Select either the master or detail table in the Database tree view (the left pane). In this example, we choose the master table - "Orders" table. Then we select the Table tab in the right pane.
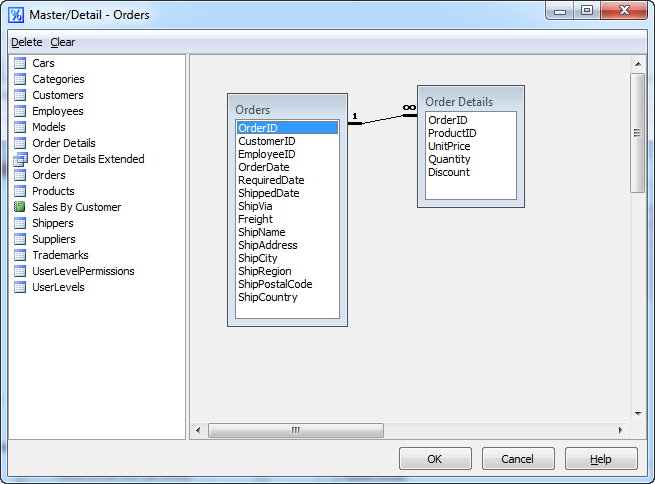
Then in [Master/Detail] panel at the bottom right corner of the page, click [Modify...] to bring up the visual master/detail relationship editor. Drag the detail table from the table list on the left to the diagram on the right.
Then create a relationship between them by dragging from the master field (key field in master table) to the detail field (foreign key field in the detail table).
If there are more linked field, repeat the step until all the relationships are setup. In this tutorial, we only have one detail field ([Order Details].OrderID) and one master field (Orders.OrderID). ASPMaker supports multiple master/detail, if the table has other master tables or detail tables, just repeat above process. In this example, we have only one master/detail relationship, so we click [OK] to confirm. The master/setail relationship is setup.
If you want to enable Master/Detail-Add and/or Master/Detail-Edit, enable Grid-Add and/or Grid-Edit for the detail table in the Table Setup page:
If you have the YUI Container or PreviewRow extension (for registered users only) and want to enable detail record preview by Ajax, you can click Tools->Extension to enable it. Also see Third-Party Tools.
3. ASP Script Generation Click the [Generate ASP] icon to go to the [Generate] tab, click the [Generate] button. ASPMaker will generate the required ASP scripts automatically. 4. Running the ASP Application Click on the link to the "Orders" table, there will be a new column of "Order Details Details" which links to the "Order Details" table. Click on the link to access the Order Details for that Order.
If you have enabled YUI Container extension. move your mouse cursor over the "Order Details..." link and you'll see:
Click the "Order Details" link, the Detail Record List Page for "Order Details" will be shown as below. To add, delete, view, edit or search records in the Detail table, simply click on the corresponding links in the page.
Click "Back to Master Page" to go back to the master page, click the "Edit" or "Copy" link under the "Order Details" link, or click the "Add Orders/Order Details", the Master/Detail-Add or Master/Detail-Edit page (actually the Add/Edit page for the master table with Grid-Add/Edit page for the detail table) will be shown. You can enter one master record with a number of detail records. For example, Master/Detail-Edit:
In Master/Detail-Add/Edit mode, you can click "Add Blank Row" or "Delete" to add or delete rows wiithout refreshing the page. Note this feature is implemented by JavaScript, newer version of browsers are required.
|
| ©2001-2012 e.World Technology Ltd. All rights reserved. |