Compatibility Properties Setup
Compatibility Properties are used to make the generated scripts work with an existing ASP.NET application.
If your ASP.NET application generated by ASP.NET Report Maker is standalone, that is, resides in a separate folder from other ASP.NET application, there is no need to set these properties.
However, if you mix the generated scripts with other ASP.NET application in the same folder, the generated header, footer, login, logout and default pages may overwrite the same pages for the existing ASP.NET application because these file names are typical and both applications possibly have the same file names. For example, if you generated the output scripts to the same destination folder of an ASP.NET Maker project, those files will be overwritten.
If the Compatibility Properties are enabled, during script generation, the header, footer, login, logout and default pages can be skipped so they won't overwrite existing files. Instead, the generated scripts will use the paths of header, footer, login, logout and default pages specified by the Compatibility Properties so both ASP.NET application shares the existing files. Therefore, once you have customized the header and footer for use with both ASP.NET applications, they will not be overwritten the next time you re-generate scripts using ASP.NET Report Maker.
Note: The header and footer files are included in the script using <!--#include file="filename.ext"-->. If you generate the output scripts to a folder at a level different from the existing ASP.NET application, do NOT use Compatibility Properties unless you are sure that your header and footer work fine at different level. For example, if relative paths are used in the header and footer, the paths will be translated to different paths when the header or footer is includes by scripts at different levels.
Set up the Compatibility Properties Automatically (Requires ASP.NET Maker 8.1 or Later)
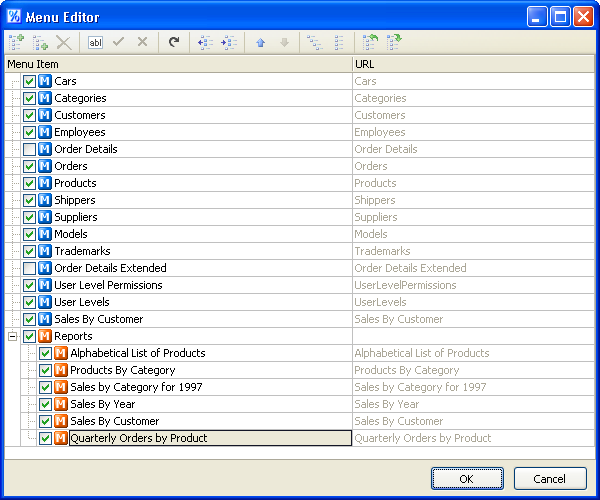
If the existing ASP.NET application is generated by ASP.NET Maker 8 or later, the compatibiltiy can be set up easily in the ASP.NET Maker project. ASP.NET Maker can load the ASP.NET Report Maker project, set up the compatibility properties automatically and load the menu items from the ASP.NET Report Maker project to the ASP.NET Maker project. Since ASP.NET Maker will update your ASP.NET Report Maker project, to avoid overwriting each other, you should save your ASP.NET Report Maker project and close ASP.NET Report Maker first. Then in ASP.NET Maker, open the Menu Editor, click the [Import] button in the toolbar,

Note: This is menu editor in ASP.NET Maker.
Select your ASP.NET Report Maker project (4.0 or later), then click [OK]. The imported menu items will be represented by orange icons, you can then re-arrange the display order of the menu items if necessary.

Re-open the ASP.NET Report Maker project in ASP.NET Report Maker, click [Tools] -> [Compatibility Properties] and you'll see that the compatibility properties has been setup.
Note: If you change User Level settings in your ASP.NET Report Maker project later, the imported menu items in the ASP.NET Maker project will NOT be updated automatically, you'll need to repeat above again.
Set up the Compatibility Properties Manually
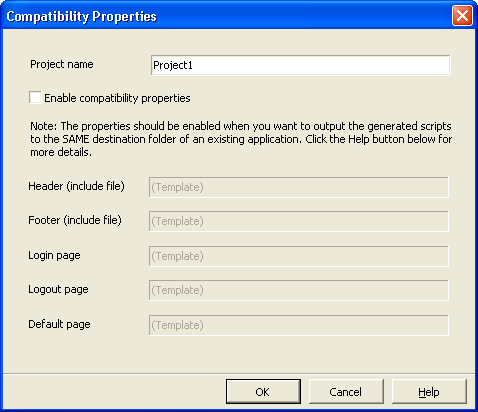
You can also set up the Compatibility Properties manually as in previous versions. In ASP.NET Report Maker, click [Tools] -> [Compatibility Properties], the following form will show up:

Properties:
| Project Name |
Specifies the project name of the project.
In our products, project name is generally used in session variable names to distinguish projects. To make your ASP.NET Report Maker project works with our other products, for example, ASP.NET Maker, you must use the same project name.
Normally, the project name is the same as the project file name, but there are cases that the project name is different, it is therefore recommended that you check the project name of the ASP.NET Maker project first (see Project File), then you enter the same project name to ASP.NET Report Maker. In ASP, project name is case-insensitive.
Notes:
- If you don't use security, there is no need to change the project name.
- This method will not work for other Web technologies such as PHP or ASP.NET because the session variables can not be shared across technologies.
- The method will not work for products developed by other developers because each product has its own method to persist the login and security status.
- If you save the project as the another file name using [Save As...], the project name will still be changed accordingly. If you want to keep the project name unchanged, use [Save a Copy...]. (See Project File)
|
| Enable compatibility properties |
Check this to enable compatibility properties. |
| Header (Include file) |
Specifies the path of the header include file.
Default value is "(Template)", which means the path is determined by the template.
When enabled, the path you enter will be used in the generated script as follows:
<!--#include file="your header path"-->
(Also see note below.) |
| Footer (Include file) |
Specifies the path of the footer include file.
Default value is "(Template)", which means the path is determined by the template.
When enabled, the path you enter will be used in the generated script as follows:
<!--#include file="your footer path"-->
(Also see note below.) |
| Login Page |
Specifies the path of the login page.
Default value is "(Template)", which means the path is determined by the template.
When enabled, the path you enter will be used in the generated script as follows:
Response.Redirect "your login page" or <A href="your login page">...</A>
(Also see note below.) |
| Logout Page |
Specifies the path of the logout page.
Default value is "(Template)", which means the path is determined by the template.
When enabled, the path you enter will be used in the generated script as follows:
<A href="your logout page">...</A>
(Also see note below.) |
Default Page |
Specifies the path of the default page.
Default value is "(Template)", which means the path is determined by the template.
When enabled, the path you enter will be used in the generated script as follows:
header("Location: your default page");
(Also see note below.) |
Note: Make sure you enter a path. If compatibility properties is enabled but the path is empty, the file in the template will still be generated by ASP.NET Report Maker and used by other generated scripts as normal.
Note: When Compatibility Properties are enabled, the menu is not generated, you'll need to intergrate the menu items for the reports to the existing ASP.NET application yourself.
Also See:
Tutorial - Compatibility Properties - Integrating with existing ASP.NET Maker project
|

