Security Settings
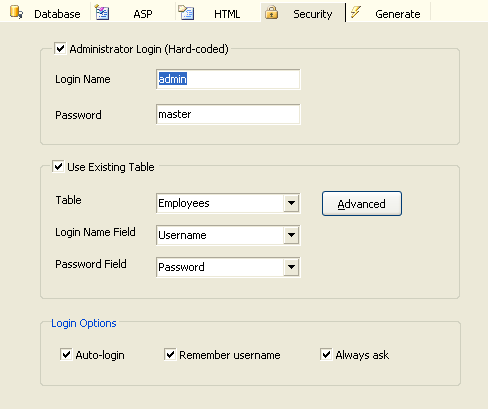
| Administrator Login (Hard-Coded) |
Administrator user id and password |
| Login Name |
Login Name for administrator |
| Password |
Password for administrator |
| Use Existing Table |
Link to existing table for login name and password validation |
| Table |
Existing table in database containing login name and password information |
| Login Name Field |
Login Name field in table used for authentication |
| Password Field |
Password field in table used for authentication |
| Login Options |
Login options in the login page:
Auto-login - Auto login until the user logout explicitly
Remember username - Save the user's user name in cookie
Always ask - Do not save user name and password, always ask for them in the login page |
Auto-login
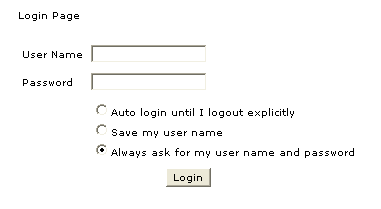
ASP Report Maker supports auto-login. When you enable the auto-login feature, a few cookies will be placed on the user's computer to identify the user, meaning that the user do not have to type username and password every time he/she visit the site.
For this reason, you should advise your users not to use this feature on a public or shared computer, as any other user of the computer will be able to access the account.
Advanced Security
ASP Report Maker's Advanced Security feature allows you to setup User ID, assign User
Levels to users and create a complete user registration system. To setup, click the [Advanced] button.
Anonymous User
The permissions for Anonymous users are defined in this form.
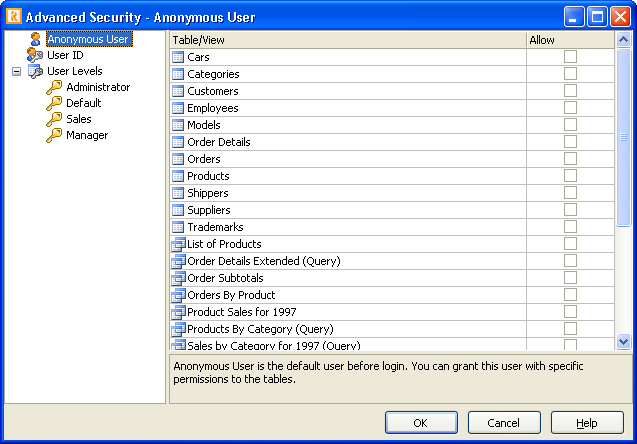
Steps to setup Anonymous User permissions:
- Click on Anonymous User in the left pane,
- Define the permissions for each table.
User ID
User ID Security secures data at record level. Protected tables must have an [User ID Field] for identifying which user a record belongs to. The User ID field names can be different in tables though. When User ID security is enabled, users can only access their own data.
[Parent User ID Field] stores the parent User ID that the user belongs to. For example, a parent user can be the manager that the employee reports to. You can select an Parent User ID for users so the parent user can view the child users' records as his/her own.
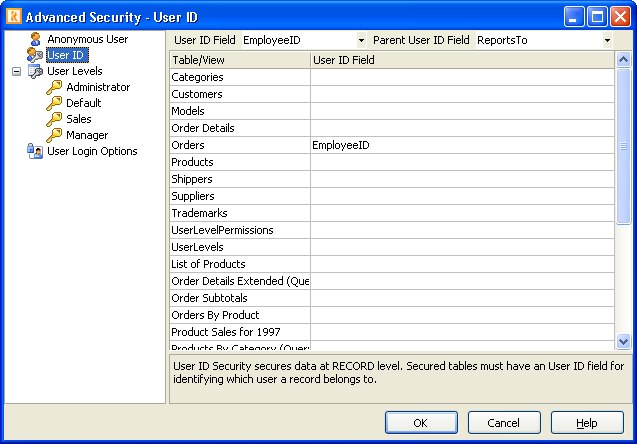
Steps to setup User ID security for different tables/views:
- Click on User ID in the left pane,
- Select the [User ID field] from your user table, this field is usually the primary key of the User Table. (note: if this field is not set, the feature is disabled)
- To enable Parent User ID security, select the [Parent User ID field] from your user table, (note: if this field is not set, the feature is disabled)
- In the [User
ID Field] column, select the User ID Field for the tables/views that requires User ID security.
User Level
User Level Security secures data at table level. Each user level is granted with specific permissions to tables in the database.
There are 2 types of User Level security:
1. Static User Levels - the User Levels and the permissions are defined in this form and the User Levels are not to be changed after script generation.
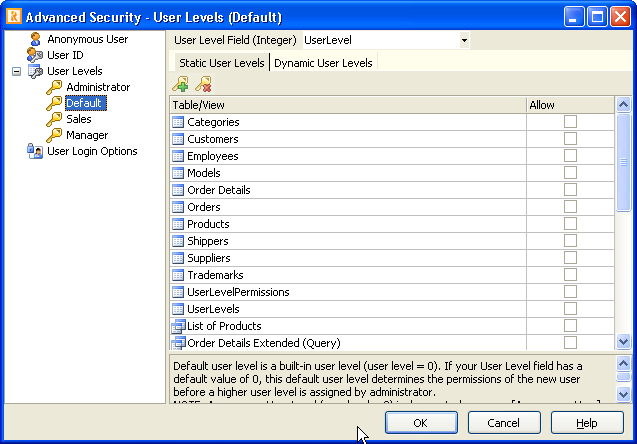
Steps to setup static User Level security for different tables/views:
- Click on User Levels in the left pane,
- Select an integer field in your user table as the [User Level field], (Note: if this field is not set, the feature is disabled)
- Define your user levels, click
 icon the add an user level and icon the add an user level and  icon to delete an user level. icon to delete an user level.
2. Dynamic User Levels - the User Levels and the permissions are defined in 2 tables in the database, the User Levels can still be changed with the generated scripts.
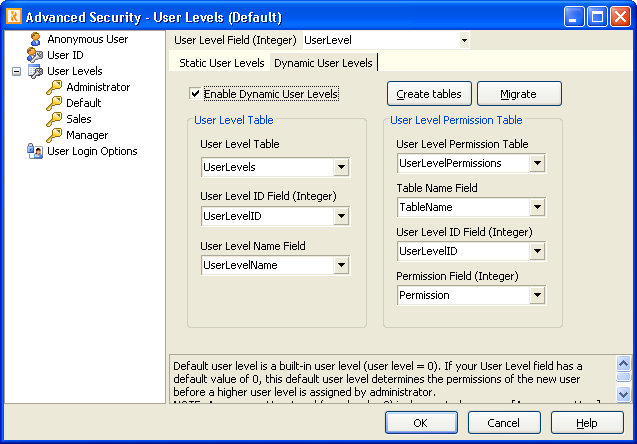
Steps to setup static User Level security for different tables/views:
- Click on User Levels in the left pane,
- Select an integer field in your user table as the [User Level field], (note: if this field is not set, the feature is disabled)
- Switch to the [Dynamic User Levels] tab, check [Enable Dynamic User Levels],
- Select your User Level Table and User Level Permission Table and the required fields.
The User Level Table and User Level Permission Table must have the following fields, note the data types, User Level ID and the Permission fields must be of integer type, the field names can be different though:


If you want ASP Report Maker to create these 2 tables in your database, click the [Create tables] button, the following form will display for you to change the table/field names if necessary. You can change the table/field names and then click OK to continue.
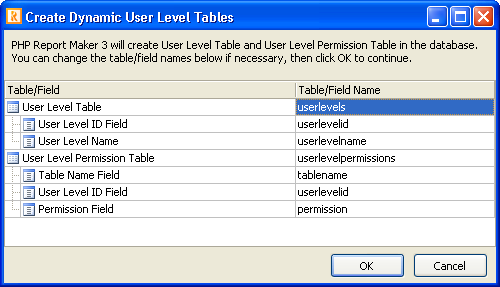
If you have projects created by previous versions of ASP Report Maker you may want to use dynamic User Levels and migrate the previously defined static User Levels in the project to the database. After selecting or creating the User Level and User Level Permission tables/fields, just click the [Migrate] button to let ASP Report Maker do that for you.
There are two built-in user levels:
Administrator - Administrator user level is a built-in user level that has all permissions plus the privileges to modify User IDs and User Levels. Its permissions are same as that of the hard-coded Administrator Login
Default - Default user level is built-in user level with user level = 0. Since User Level field is an integer field, if you set a default value of 0 for this field, this user level will become the default user level for the user after registration and before the Administrator assigning another higher user level.
The Anonymous built-in user level in previous versions is deprecated. Use the new [Anonymous User] (see above) to configure permissions for users before login.
Note: ASP Report Maker does not support data modification, it does NOT generate scripts to update the User Level Table and User Level Permission Table.
User Login Options
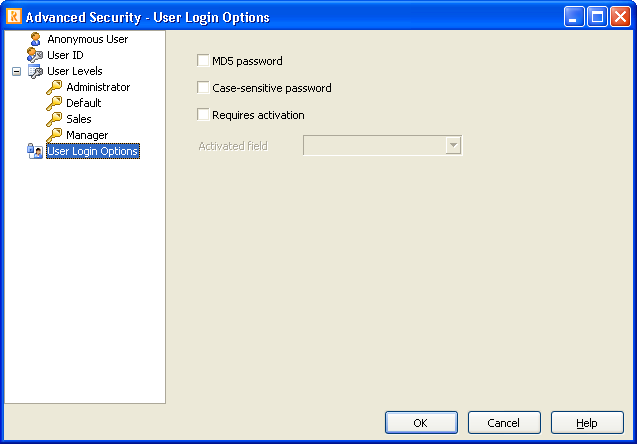
| MD5 password |
Use MD5 password
Note: If you enable MD5 password, make sure that the passwords in your user table are stored as MD5 hash (32-character hexadecimal number) of the clear text password. If you also use case-insensitive password, convert the clear text passwords to lower case first before calculating MD5 hash. Otherwise, existing users will not be able to login.
|
| Case-sensitive password |
Use case-sensitive password |
| Requires activation |
Specify if the user table has an Activated field (see below).
|
| Activated field |
Email activated field in user table used for storing the status of user. A boolean field is recommended, although an integer field or a string field will also work.
Notes:
- Only used if Requires activation (see above) is checked.
- If enabled, make sure the activated field for existing users in your user table is updated with your activation values (e.g. True/False, 1/0, Y/N) or the existing users cannot login because they are not recognized as activated.
|
Also See:
Tutorial - User ID Security
Tutorial - Static User Level Security
Tutorial - Dynamic User Level Security
|

