Custom Templates
By default fields are presented in tabular form, e.g. one field per row in Add/Edit/Search/View page, or one record per row in List/Delete page. Custom Templates enable you to re-arrange the fields in your own way.
Note: Do not confuse Custom Template (which is just a table level setting within a project) with customizing the template zip file. If you want to customize the general layout of the generated site or customize something for all tables and all projects, you should customize the template zip file, see Customizing Template.
How it Works
If a Custom Template is provided, PHPMaker splits the original code in many small client side templates. A client side template is HTML code enclosed by <script type="text/html"> and </script>. Since browsers do not know how to execute "text/html" scripts, they simply ignore it. So it is possible to re-assemble HTML from the small client side templates by JavaScript based on your provided Custom Template. In other words, it is simply re-arrangement of existing HTML parts in browser.
During script generation, PHPMaker converts your Custom Template to a client side template and outputs JavaScript to render the template. The client side template is rendered by JsRender (see Third-Party Tools) which is a third-party JavaScript template engine optimized for high-performance pure string-based rendering. The generated scripts only use its "template composition" feature to render HTML from other external templates, your Custom Template can however make use of its other features if you need to. (Note that JsRender is still in beta, if you use its features directly, be aware that there may be some breaking changes in the future.)
What it Can Do (and Cannot Do)
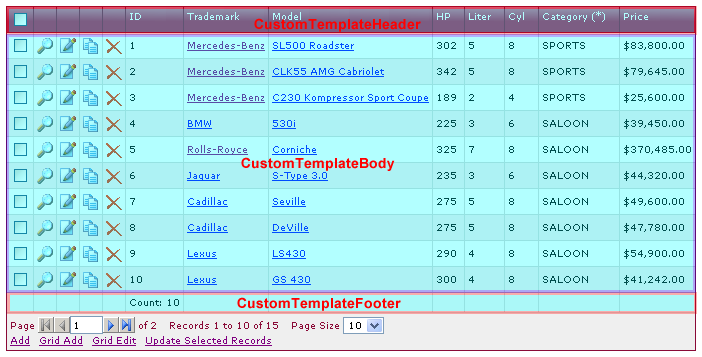
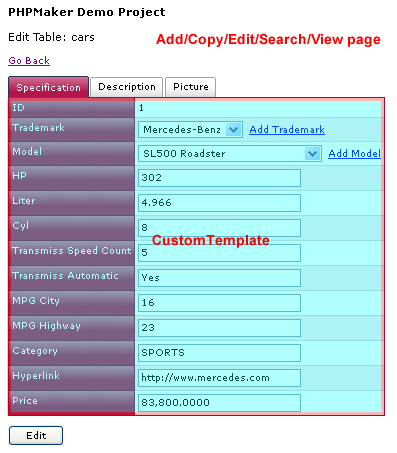
Custom Templates let you customize the layout of the fields originally placed in the main HTML table of the page, they cannot customize HTML outside those regions. The customizable regions are highlighted as follows:


Custom Template Tags
To let you create your Custom Templates easily, PHPMaker supports the following Custom Template Tags. Since JsRender supports tags enclosed by {{ and }} (double curly brackets), in order to let you use them in your Custom Templates, PHPMaker Custom Template Tags uses {{{ and }}} (triple curly brackets) to differentiate. Note that Custom Template Tags will be converted to JsRender tags during script generation, they can only be used in PHPMaker user interface, they cannot be used elsewhere such as template (zip file) or generated scripts.
In the following table, field represents the field variable name. In general, if the field name is alphanumeric, field variable name is same as the field name. Otherwise, spaces are replaced by underscores, and other non alphanumeric characters are replaced by their hexadecimal string representation of their unicode value. If the variable is a reserved word or starts with a digit, it will be prepended with an underscore. If you are not sure, drag a field from the database pane to the editor instead of typing {{{field}}}.
| {{{field}}} |
Field with or without caption and other values, depending on where it is used:
- List/Delete page
CustomTemplateHeader
- field caption (supports sorting)
CustomTemplateBody
- field value only
CustomTemplateFooter
- field aggregate value
- Search page/Extended Search panel - field caption + search operator + search value (+ search condition + search operator 2 + search value 2)
- Other pages - field caption + field value
|
| {{{caption field}}} |
Field caption |
| {{{header field}}} |
Field header (caption with sort links) |
| {{{value field}}}} |
Field value (or input) without caption. |
| {{{value2 field}}}} |
Search value 2. For use with Search page or Extended Search panel only. |
| {{{operator field}}}} |
Search operator. For use with Search page or Extended Search panel only. |
| {{{operator2 field}}}} |
Search operator 2. For use with Search page or Extended Search panel only. |
| {{{condition field}}}} |
Search condition. For use with Search page or Extended Search panel only. |
| {{{cell_attrs field}}}} |
Cell attributes for the field in the current row (originally for the <td> tag of the field). For use in List/Delete page only. |
{{{list_options}}} or
{{{list_options n}}} |
List options with <td> tags. Each list option is enclosed by "<td>" and "</td>". For use in List page only.
n is the "rowspan" attribute of the <td> tag and it is optional. If not specified, default is 1. |
| {{{list_options_2}}} |
List options with <span> tags. Each list option is enclosed by "<span>" and "</span>". For use in CustomTemplateBody (List Page) only. |
| {{{list_option xxx}}} |
List options with name xxx. For use in CustomTemplateBody (List Page) only. Possible values of xxx are same as those used in server events, i.e.
- copy
- delete
- edit
- checkbox
- details - for use with PreviewRow extension (for registered users) only, or
- detail_<DetailTable> - NOT for use with PreviewRow extension (for registered users)
|
| {{{page_n}}}...{{{/page_n}}} |
Multi-Page template tag for page n. The content inside the tags is the Custom Template for page n.
Note: For use with Multi-Page (see Table Setup) only. No need to use this tag if single page.
|
| {{{row_attrs}}} |
Current row attributes (originally for the <tr> tag of the record) . For use in List/Delete page only. |
| {{{row_cnt}}} |
Current row index (1-based). For use in List/Delete page only. |
| {{{confirm_password}}} |
Text input (with caption) for password confirmation. For use in Registration Page only. |
| {{{value confirm_password}}} |
Text input (without caption) for password confirmation. For use in Registration Page only. |
How to Use
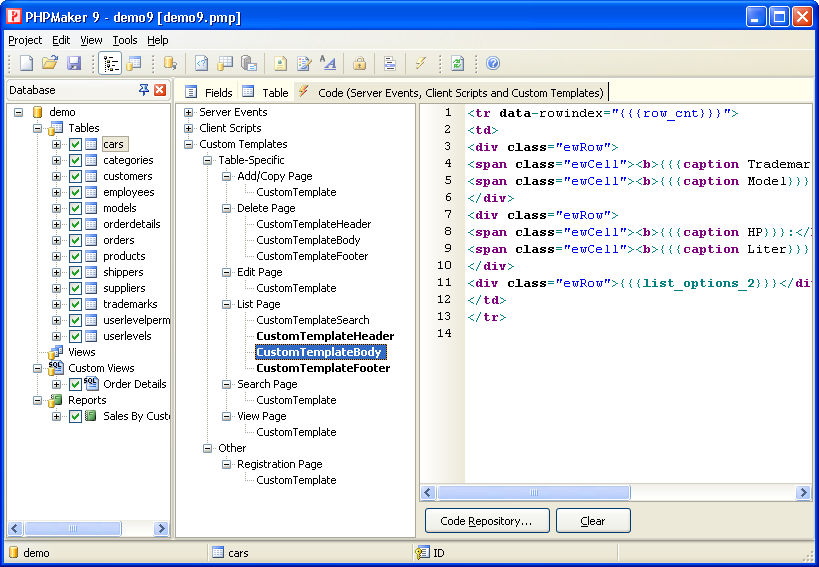
To enter your Custom Template for a table, follow the following steps:
- Select the table in the database pane,
- Select the Code tab (which contains Server Events, Client Scripts and Custom Templates),
- Scroll down the treeview or collapse the Server Events and Client Scripts node, select a template node under Custom Templates,
- Enter your Custom Template in the editor. Note that you can drag a field from the database pane to the editor instead of typing {{{field}}}.

Then just generate and run your scripts in your browser as usual.
Examples
Example 1 - Custom Template in Add/Edit/Search/View page or Extended Search in List page
{{{Trademark}}} {{{Model}}}<br>
{{{HP}}} {{{Liter}}}
If you want to have more control on the layout, use DIV and SPAN with CSS styles, e.g.
<div class="ewRow"><span class="ewCell">{{{Trademark}}}</span><span class="ewCell">{{{Model}}}</span></div>
<div class="ewRow"><span class="ewCell">{{{HP}}}</span><span class="ewCell">{{{Liter}}}</span></div>
or use a HTML table, e.g.
<table class="ewTable">
<tbody>
<tr><td>{{{Trademark}}}</td><td>{{{Model}}}</td></tr>
<tr><td>{{{HP}}}</td><td>{{{Liter}}}</td></tr>
</tbody>
</table>
Example 2 - Custom Template in Add/Edit/Search/View page (Multi-Page)
{{{page_1}}}
<div class="ewRow"><span class="ewCell">{{{Trademark}}}</span><span class="ewCell">{{{Model}}}</span></div>
<div class="ewRow"><span class="ewCell">{{{HP}}}</span><span class="ewCell">{{{Liter}}}</span></div>
{{{/page_1}}}
{{{page_2}}}
<div class="ewRow">{{{Description}}}</div>
{{{/page_2}}}
{{{page_3}}}
<div class="ewRow">{{{Picture}}}</div>
{{{/page_3}}}
Example 3 - Card view in List page using {{{list_options_2}}}
CustomTemplateHeader
<table class="ewTable">
<tbody>
CustomTemplateBody
<tr{{{row_attrs}}}>
<td>
<div class="ewRow">
<span class="ewCell"><b>{{{caption Trademark}}}:</b> {{{Trademark}}}</span>
<span class="ewCell"><b>{{{caption Model}}}:</b> {{{Model}}}</span>
</div>
<div class="ewRow">
<span class="ewCell"><b>{{{caption HP}}}:</b> {{{HP}}}</span>
<span class="ewCell"><b>{{{caption Liter}}}:</b> {{{Liter}}}</span>
</div>
<div class="ewRow">{{{list_options_2}}}</div>
</td>
</tr>
CustomTemplateFooter
</tbody>
</table>
Example 4 - Show each record in 2 rows in List page using {{{list_options n}}} where n is the rowspan. Note: Do not confuse {{{list_options 2}}} with {{{list_options_2}}}.
CustomTemplateHeader
<table cellspacing="0" class="ewTable ewTableSeparate">
<thead>
<tr class="ewTableHeader">
{{{list_options 2}}}<td>{{{Trademark}}}</td><td>{{{Model}}}</td>
</tr>
<tr class="ewTableHeader">
<td>{{{HP}}}</td><td>{{{Liter}}}</td>
</tr>
</thead>
<tbody>
CustomTemplateBody
<tr{{{row_attrs}}}>
{{{list_options 2}}}<td>{{{Trademark}}}</td><td>{{{Model}}}</td>
</tr>
<tr{{{row_attrs}}}>
<td>{{{HP}}}</td><td>{{{Liter}}}</td>
</tr>
CustomTemplateFooter
</tbody>
</table>
Important Notes
- Remember that Custom Template is rearrangement of existing some HTML fragments in the page, all other code is still the same, the fields in the Custom Template should be the same as the original script. The available fields are same as the orignal script, if you try to include other fields in the table or from other table by Custom Template, it will NOT work without writing your own code. In Add/Copy/Edit page, if a field is missing, no field value is submitted but the generated scripts contain code for the field, unwanted results may occur, for example, if a field is missing in the Edit page, the field value in the table will be cleared after editing. If Multi-Page (see Table Setup) is enabled for the page, the Custom Templates should include templates for all pages using {{{page_n}}} and {{{/page_n}}}, and each field should be placed in the same page as in the original script.
- Custom Template is HTML, if you want to embed PHP code, you need to use <?php and ?> to enclose your code, if you want to use JavaScript, you need to use <script type="text/javascript"> and </script>.
- DO NOT use $this in your PHP code. There is no $this in the context, you can however use CurrentPage() to get the current page object.
- Avoid using JavaScript in the template. If you need to use JavaScript, try to put your JavaScripts in Client Scripts and Startup Scripts of the page (see Server Events and Client Scripts). If you have to use JavaScript in the template, DO NOT using document.write() because the script will be extracted from the template and be executed at the end of the template, you can however use a DIV with unique id and write to its innerHTML.
- In List page, CustomTemplateBody is the template for a record. Your Custom Template needs NOT to be a HTML table, but if it is (see the example above), then CustomTemplateHeader and CustomTemplateFooter must at least contains <table><tbody> and </tbody></table> respectively, and you need to provide the <tr> and <td> tags in these templates. If the table uses Aggregate values (see Field Setup), you should also include <tfoot> in your CustomTemplateFooter. If you want to use the PreviewRow extension (for registered users only), your Custom Template must be a HTML table because the extensions works by inserting a preview row in the table, and in CustomTemplateBody each <tr> row must contain the attribute data-rowindex="{{{row_cnt}}}" or {{{row_attrs}}} as the extension needs the row index for inserting a row below it. The row index attribute is also required for alternating/selected/highlighted row colors. Basic sample code of CustomTemplateHeader/Body/Footer can be found in Code Repository (below the editor).
- Before the Custom Template is applied, the custom JavaScript event ewRenderTemplateEvent will be fired, you can use Client Script of the page (see Server Events and Client Scripts) to subscribe this event and pass custom data to the Custom Template or even disable it.
- Custom Template does NOT support the following:
- Export to CSV/HTML/Excel/Word/XML/Email/PDF (the data is exported in original tabular format)
- Add Blank Row in Grid-Add/Edit
- Detail grid in Master/Detail-Add/Edit
|

