|
|
Tutorial - Compatibility Properties - Integrating with existing PHPMaker project Note: Before reading this tutorial, please read Compatibility Properties Setup first. In this tutorial we will show you how to put scripts generated by PHP Report Maker together with scripts generated by PHPMaker. We'll use security in both projects and demonstrate how you can make them compatible with each other. To make PHPMaker and PHP Report Maker projects work together, there are 3 requirements:
Project name in PHP Report Maker or PHPMaker is used in session variable to distinguish projects. For example, if the project name of your PHPMaker project is named as "project1", the session variable of the logged in status is Session variable "project1_status". If your project name of your PHP Report Maker project is named as "project2", when users browse from PHPMaker generated pages to PHP Report Maker generated pages, you will be considered as not logged in and be redirected to the login page. Therefore, to make PHP Report Maker project compatible with PHPMaker project, we need to use the same project name for both projects. Select one of your PHPMaker projects that uses security, check the project name (see Project File). We open the project file with a text editor (e.g. Notepad) to check the actual project name. It can be found in the <project> tag, for example, if you see: <Project Version="7.0.0.0" ProjName="demo" ...(omitted).../> The project name of the PHPMaker project is "demo", we'll use the same project name in PHP Report Maker. On the other hand, PHP application generated by PHP Report Maker is self-contained, it has its own header, footer, login, logout and default page. However, if you have an existing PHP application generated by PHPMaker, you may already have those pages already. Since those pages typically have the same name like "header.php", "footer.php", "login.php", "logout.php" and "index.php", generating your PHP Report Maker project to the same folder may create several problems:
To solve these problem, PHP Report Maker allows you to enable Compatibility Properties. When enabled, PHP Report Maker will behaves a little differently during generation. If existing paths are specified, the header, footer, login, logout and default pages will not be generated so they won't overwrite existing files. Instead, the generated scripts will use the paths of header, footer, login, logout and default pages specified by the Compatibility Properties so both PHP application shares the common files. Therefore, once you have customized the header and footer for use with both PHP applications, they will not be overwritten when you re-generate scripts using PHP Report Maker.
Steps to Setup Compatibility Properties 1. Loading PHP Report Maker Open PHP Report Maker, open the PHP Report Maker Project you previously used in the Advanced Security tutorials (Tutorial - User ID Security or Tutorial - User Level Security). Compare the Advanced Security settings with that in your PHPMaker project. Check the User ID field, Parent User ID field, User Level field and User Levels.
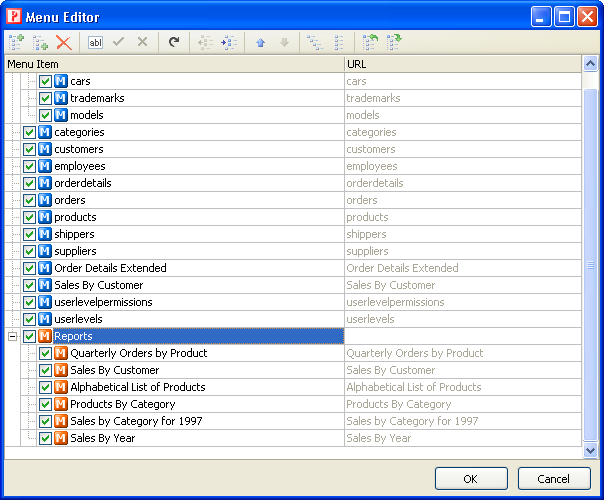
2. Setting up Compatibility Properties You can setup using EITHER of the following 2 methods: 2a. Setup in PHPMaker (Requires PHPMaker 7.1 or later) If the existing PHP application is generated by PHPMaker 7.1 or later, the compatibiltiy can be set up much more easily in the PHPMaker project. PHPMaker can load the PHP Report Maker project, set up above properties automatically and load the menu items from the PHP Report Maker project to the PHPMaker project. Since PHPMaker will update your PHP Report Maker project, to avoid overwriting each other, you should save your PHP Report Maker project and close PHP Report Maker first. Then in PHPMaker, open the Menu Editor, click the [Import] button in the toolbar, select your PHP Report Maker project (4.0 or later), then click [OK]. The imported menu items will be represented by orange icons, you can then re-arrange the display order of the menu items if necessary.
OR 2b. Setup in PHP Report Maker In the main toolbar, click [Tools] -> [Compatibility Properties]. Enter "project1" in the [Project name] textbox. (The actual project name depends on your PHPMaker project.) Check [Enable compatibility properties], enter the file name of the header, footer, login, logout and default pages in your PHPMaker project. Enter the path of the login page generated by PHPMaker into the [Login page] textbox. Similarly for the [Logout page] setting. In this tutorial, we assume you use default settings in your PHPMaker project, so we just enter the following settings:
Click [OK] to save. 3. PHP Script Generation Go to the [Generate] tab, select the same [Application root folder] and [Destination folder] as in your PHPMaker project. Click the [Generate] button and PHP Report Maker will generate the required PHP scripts automatically. 4. Running the PHP Application Note: From PHP Report maker 3, when Compatibility Properties are enabled, the menu is not generated, you'll need to intergrate the menu items for the reports to the existing PHP application yourself. Run your existing PHP application with your browser. If use security and you have not logged in, you'll be redirected to the login page, If your PHPMaker project uses security, you should find yourself been redirected to the login page from the PHPMaker project. Login so you can browse the existing PHPMaker pages. Now click the new links in the menu to view the reports. You'll be redirected to the default report you specified in your PHP Report Maker project without the need to login again. Check the User ID security or User Level security by browsing the reports and you'll find that it works as expected.
|
| ©2007-2011 e.World Technology Ltd. All rights reserved. |