ASP Settings General Options
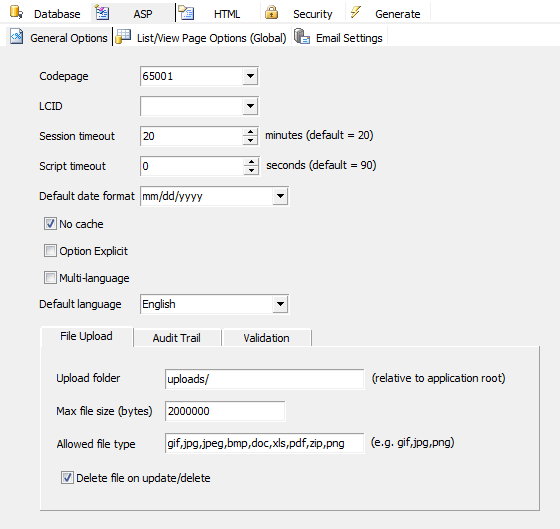
| CodePage |
Codepage to be used for your web site. Code page must be compatible with Charset (see HTML Settings).
If you use Multi-Langauge (see below), this setting must be "65001" (utf-8). |
| LCID |
Locale ID to be used for your web site |
| Default Date Format |
yyyy/mm/dd, mm/dd/yyyy, dd/mm/yyyy,
yyyy-mm-dd, mm-dd-yyyy, dd-mm-yyyy,
yyyy.mm.dd, mm.dd.yyyy, dd.mm.yyyy |
| Session Timeout |
The length of time in minutes before an idle session is terminated. If blank or 0, default setting (20 minutes) of the server will be used. |
| Sript Timeout |
The maximum number of seconds a script can run before it is terminated. If blank or 0, default setting (90 minutes) of the server will be used. |
| No Cache |
Whether caching is required on browser |
| Option Explicit |
All variable names be defined |
| Multi-Language |
Enable multi-language project. If enabled, a combobox will appear on the top of the generated scripts for user to select langauge. See Tools for selecting languages for the multi-language project.
Important Notes:
- Multi-Language project must use utf-8 encoding. The charset of the project must be "utf-8". The code page must be "65001".
- The data in your database must be stored in unicode, otherwise your data will not be displayed properly.
- If you have customized the template and put unicode characters in the template directly instead of using language files, enable the Advanced Setting UTF-8 output files (see Customizing Template and Tools).
|
| Default Language |
Default language of the project. It must be compatible with CodePage (see above) and Charset (see HTML Settings). Default is English.
There is always one default language for a project. Only the English langauge file (english.xml) is shipped with ASPMaker. If your project is single language but you use another language, create a language file for your language (see Customizing Template), put it in the "languages" subfolder under the installation folder and then select your default language using this combobox.
If you enable Multi-Language, you must select one of the selected languages as the default language.
|
| File Upload |
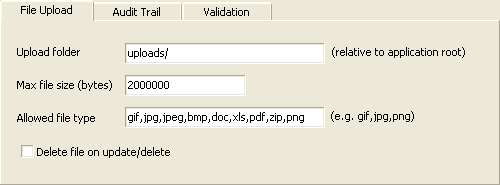
Upload folder - The global folder where the uploaded files resides. If you do not enter a field specific upload path for a file upload field in the Edit Tag panel of the Field Setup page, all the uploaded files will be put in this folder.
Important note:
- Unlike the field specific upload folder setting (which is a VBScript expression), this field specific setting must be a constant sting without double quotes. If you want dynamic upload folders for different fields, use the field specific upload folder setting instead.
- Make sure that the Web server user have read/write access to the folder. You can right-click the folder in Windows Explorer and add read/write access for IUSR_<MachineName> on the Security tab.
- The path is relative to application root. Use slashes "/" as path delimiter, no leading slash. e.g. If the application root of your website is C:\Inetpub\wwwroot\demo and you enter "uploads/" in this textbox, the folder for the uploaded files will be C:\Inetpub\wwwroot\demo\uploads. If you are not sure which folder is application root, please read Creating Virtual Directories in IIS.
Max File Size - Maximum file upload size in bytes
Note: If you use IIS 6 (or later) and want to upload more than 200kb, you
have to change the value of "AspMaxRequestEntityAllowed" in
metabase.xml under <Windows Folder>\System32\Inetsrv. Before you edit the file,
be sure to stop the IIS service first or else you won't be able to save
the file.
Allowed file type - The allowed file extensions of the uploaded files. Separate the file extensions (without ".") by comma, e.g. gif,png,png)
Delete file on update/delete - Option to delete the uploaded file when the field value is replaced, removed or if the record is deleted. |
| Audit Trail |
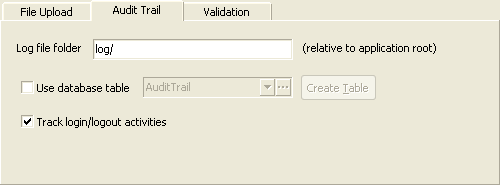
You can choose to log activities in a log file or in a database table.
Log file folder - The folder where the audit trail log file resides.
Important note:
- Make sure that the Web server user have read/write access to the folder. You can right-click the folder and add read/write access for IUSR_<MachineName> on the Security tab.
- The path is relative to application root. Use slashes "/" as path delimiter, no leading slash. e.g. If the application root of your website is C:\Inetpub\wwwroot\demo and you enter "uploads/" in this textbox, the folder for the log file will be C:\Inetpub\wwwroot\demo\uploads.
Use database table - Log the activities in the specified table instead of log file. The table must have the following fields: (actual data types depend on database type)
- DateTime (DateTime)
- Script (VarChar)
- User (VarChar)
- Action (VarChar)
- Table (VarChar)
- Field (VarChar)
- KeyValue (Long VarChar)
- OldValue (Long VarChar)
- NewValue (Long VarChar)
You can create the database yourselves and select the table in the combobox, then click the [...] button to select the fields in your table. Alternatively, if you have not created the table yet, you can click [Create Table] and let ASPMaker creates the table and setup the settings for you.
Note: The [Create Table] button supports Access, SQL Server, MySQL and Oracle only.
Track login/logout activities - If security feature is enabled, login/logout activities will also be logged. |
| Validation |
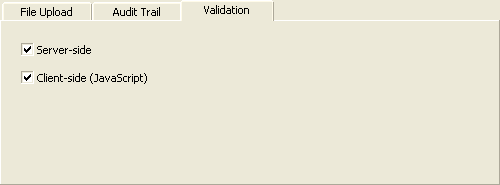
Server-side - Enable server-side form validation.
Client-side (JavaScript) - Enable client-side form validation.
Note: If the available validation format in the Edit Tag panel (see Field Setup) does not fulfil your requiements, you can use your own server-side and/or client-side validation code using Sever Event and Client Scripts.
|
List/View Page Options (Global)
The following list/view page options are global for all tables. If you want different settings for a particular table, you can use table-specific options available in the Table Setup page.
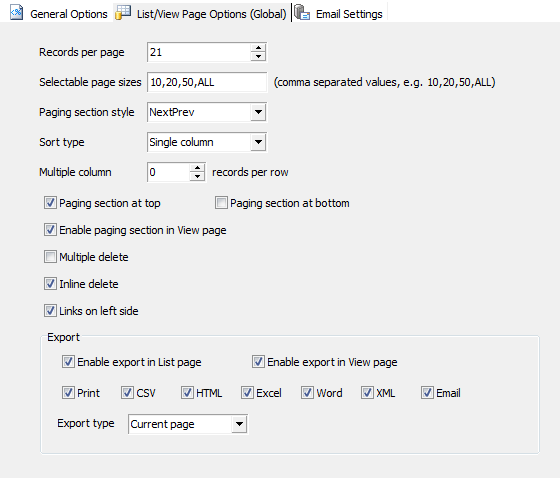
| Records per page |
Number of records to be displayed on the list page of all tables.
If blank or 0, default setting of 20 will be used. |
| Selectable page sizes |
Number of records to be selected by user. Comma separated values,
e.g. 10,20,50,ALL.
Note: "ALL" (without
quotes) is supported, other values must be integers. |
| Paging section style |
"NumericPages" or "NextPrev" |
| Sort type |
None, Single column or Multiple
column. If Multiple column is selected,
the generated list page supports multi-column sorting by Ctrl-clicking
the table header. |
| Multiple column |
Show multiple records per row. Default is 0. This feature will
only take effect if the value is > 0. |
| Paging section at top |
Show the paging section at top (also applies to View page) |
| Paging section at bottom |
Show the paging section at bottom (also applies to View page) |
| Enable paging section in View page |
Show paging section in View also |
| Multiple delete |
Show checkboxes in the list page for selecting multiple records
to delete |
| Inline delete |
Delete records directly without showing delete confirm page |
| Links on left side |
Show the links on the left instead of right |
| Export |
Enable export in List page - allow export in List pages
Enable export in View page - allow export in View pages also
Print/CSV/HTML/Excel/Word/XML/Email - Records can be exported to Print (printer-friendly), CSV, HTML, Excel, Word, XML format or sent as HTML email content.
Note that the fields in printer friendly version are same as in List/View page, while the fields in other format are determined by the Export setting of the field in Field Setup page.
Export type - Determines which records to export. The follows are supported:
- All Page - Records in all pages are exported
- Current Page - All records in current page are exported
- Selected Record - If selected, a checkbox will be displayed in each row for selection. Only selected records in the current page are exported. (Selecting records in different pages is not allowed.) To select records primary key is required, Current Page export type will be used for tables without primary key.
Note: If Email, the user can select sending the records as URL or HTML. If sending URL only, note that the recipient will need to click the URL and go to your site to view the records. All security settings will apply, the recipient may need to login. If the recipient is not an user of your website and your page is protected, you should send by HTML only.
Known Internet Explorer issue:
For known MIME (Multipurpose Internet Mail Extensions) types such
as Microsoft Word ("application/ms-word"), the default behavior
of some older versions of Internet Explorer is to open the document
in the browser. Also, to allow user saving the file with a proper
file extension (otherwise the file extension will be .asp), ASPMaker
uses content-disposition header to override this behavior by default.
For example:
Response.AddHeader
              "content-disposition","attachment; filename=fname.ext"
When
                Internet Explorer receives the header, it raises a File Download
              dialog box. However, if user clicks [Open], Internet Explorer
              may fail to open the file. Therefore, you may want to instruct
              user to save the file directly to the user's disk without opening
              it in the browser.
Notes:
- Binary data (BLOB fields) cannot be exported.
- Export to HTML/CSV/XML are not applicable to reports.
- Images cannot be exported to Word/Excel/CSV/XML/Email.
|
Email Settings
ASPMaker supports many features that can send emails. If you use these features, you'll need to specify a SMTP server.
Note: ASPMaker generated script will detect available email components on the server automatically. Supported email components are CDO (or CDONTS), w3JMail and ASPEmail. (CDO or CDONTS is a part of Windows server and is usually installed, w3JMail and ASPEmail are third-party components and are not part of ASPMaker. The generated script will only work if any one of the supported components is installed on the server. If email cannot be sent, check with your Web server administrator or hosting provider.)
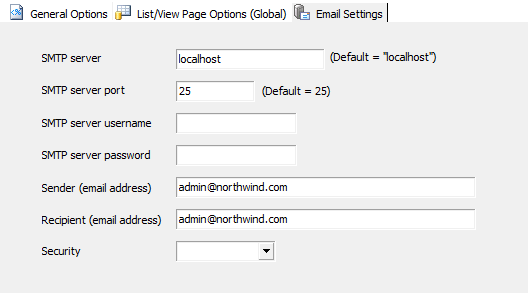
| SMTP server |
The host name or IP of the SMTP server.
By default the emails will be sent by Microsoft CDO using default SMTP server on the Web server, in such case you can specify "localhost". But sometimes the default SMTP server may be disabled, in such case you need to specify a valid SMTP server in the network of the web server. |
| SMTP server port |
Port number of SMTP server. Default is 25. |
| SMTP server username |
User name for SMTP server authentication. If your SMTP server does not require authentication, leave it blank. |
| SMTP server password |
Password for SMTP server authentication. If your SMTP server does not require authentication, leave it blank. |
| Sender (Email address) |
Email address of the sender of all emails |
| Recipient (Email address) |
Email address of the recipient(s) for notification emails when a record is added/edited/deleted (if enabled). If there are multiple recipients, separate them by comma. |
| Security |
Protocol used by the SMTP server. Possible values are: SSL.
Note: Leave this setting empty if your SMTP server does not use such security protocols. |
|