HTML Settings
General
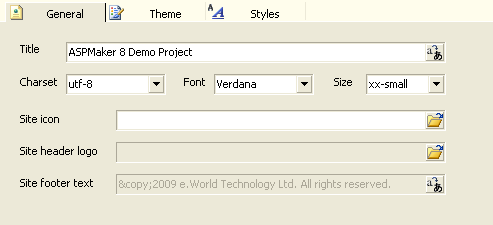
| Title |
Title displayed on all pages.
Note: If you want to use special characters, use HTML entities such as "&#euro;", or you can enter unicode caption using Unicode Property Editor, see Tools for details. |
| Charset |
Charset setting used in the META tag of the site and for exporting data. It must be compatible with CodePage (see ASP Settings).
If you use Multi-Language (see ASP Settings), this setting must be utf-8.
|
| Font |
Default text font |
| Size |
Default text size |
| Site icon |
Icon of the site. For browsers to show your URL with an icon. Must be an .ico file. |
| Site header logo |
Logo image in the header
Note: This setting is enabled in registered version only. |
| Site footer text |
Footer text (e.g. copyright statement)
Notes:
- If you use Multi-Language (see ASP Settings), use Multi-Language Property Editor, see Tools for details.
- This setting is enabled in registered version only.
|
Theme
ASPMaker provides over a dozen of themes for you to setup the look and feel of your project quickly.
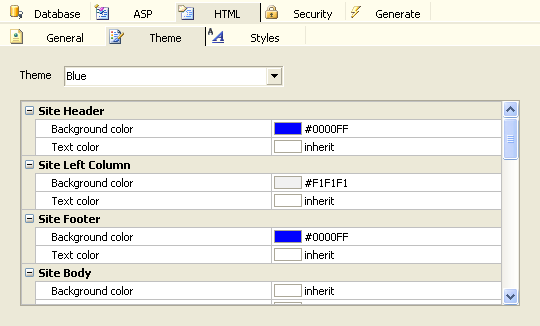
You can change the various settings in a theme to suit your style: (See Note 1 below)
| Site Header |
| Background color |
Background color |
| Text color |
Text color |
| Site Left column |
Background color |
Background color |
Text color |
Text color |
| Site Footer |
Background color |
Background color |
Text color |
Text color |
| Site Header |
Background color |
Background color |
Text color |
Text color |
| Site Body |
Background color |
Background color |
Text color |
Text color |
Link color |
Hyperlink color |
Visited Link color |
Visited hyperlink color |
Active Link color |
Active hyperlink color |
| Table Header |
Background color |
Background color |
Background image |
Background Image (See Note 2 below) |
Border color |
Border color |
Text color |
Text color |
| Table Body |
Row color |
First alternate row color |
Row Text color |
First alternate row text color |
Alternating row color |
Second alternate row color |
Alternating row Text color |
Second alternate row text color |
Edit row color |
Background color for row in edit mode (for Inline-Add/Copy/Edit only) |
Edit row Text color |
Text color of the row in edit mode |
Highlight row color |
Color when mouse cursor is over the row |
Highlight row Text color |
Text color of the highlighted row |
Selected row color |
Color when row is selected (by mouse click or selected for delete) |
Selected row Text color |
Text color of the selected row |
| Table Footer |
Background color |
Background color |
Text color |
Text color |
| Grid |
Padding |
Padding of table cells in the grid |
Border width |
Grid border width |
Border color |
Grid border color |
| Grid Lines |
Width |
Grid line width |
Color |
Grid line color |
Show |
Show/Hide Grid lines (Both, Horizontal, Vertical or None) |
| Grid Pager Panel |
Background color |
Background color |
Text color |
Text color |
| Tab |
Background color |
Tab background color |
Background image |
Tab background image |
Highlighted tab background color |
Highlighted tab background color |
Highlighted tab background image |
Highlighted tab background image |
Selected tab background color |
Selected tab background color |
Selected tab background image |
Selected tab background image |
Selected tab text color |
Selected tab text color |
Notes:
- Changing a setting in the user interface does not change the corresponding setting in the theme definitions, it only changes the setting for the project. The theme definition files (in XML format) are installed in the subfolder "themes" under the installation folder. You can easily add your own themes by duplicating one of the theme definition file (except the theme.xml which is for defining the settings and data type in a theme), rename it and modify the settings in the file, just make sure you give your theme an unique theme name.
- If you use background images, just enter the file name. All background images should be placed in the "themes\_images" subfolder for the user interface to show HTML preview. The images should also be placed in the "images" folder in the template so they will be copied to the destination folder.
Styles
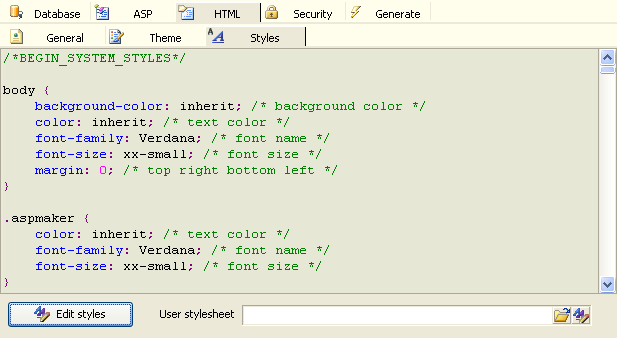
| Edit styles |
A separate CSS stylesheet will be generated for each project. Click the [Edit styles] button to open CSS editor.
Notes:
- All projects use CSS stylesheet.
- If you have TopStyle Pro (v1.5+) or TopStyle Lite (v1.5-3.1) installed on your PC, ASPMaker will use it automatically.
When you edit the CSS styles in the editor, note the follows:
- DO NOT MODIFY the system styles section, it is generated by the system,
your modifications will be overwritten. If you want to change the stylesheet
template, modify the ew.css in the "themes" subfolder under the installed
directory. Only modify the ew.css if you have the necessary knowledges in
CSS.
- DO NOT REMOVE THE FOLLOWING COMMENTS:
BEGIN_USER_STYLES
END_USER_STYLES
You MUST write your styles between these two comment lines, styles
outside this user styles section will be discarded.
- If you want to override the system styles, you can copy the styles to the
User Styles Section, or you can use a separate user stylesheet.
|
| User Stylesheet |
Linking to external user stylesheet (will be copied across during
generation) |
You can see the effect of new settings immediately in the preview window
at the bottom of the HTML tab.
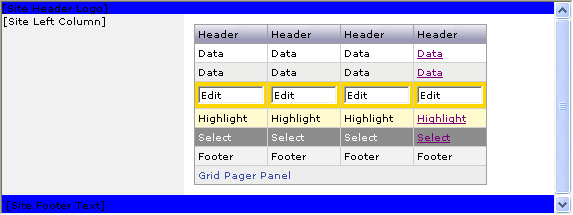
Other than choosing color from the palettes, the color picker can also
pick color directly from screen using the "eyedropper".
|