|
|
Tutorial - User Registration System In this tutorial we will show you how to setup User Registration System in ASPMaker. We will use the demo database for demonstration. The demo database is a modified version of the Access demo database Northwind.mdb for better illustration. We want to set up the "Employees" table for Registration System. Fields in the User Table, "Employees":
Steps to Setup Registration System 1. Loading ASPMaker Open ASPMaker and connect to the demo.mdb database. 2. Enabling Security and Setting up User Table Advanced Security has to be enabled first. Click the [Security] tab, check [User Existing Table], select the [Table], the [Login Name Field] and the [Password Field]. The [Advanced] button will be enabled.
3. Setting up Registration System Click the [Advanced] button, the Advanced Security window will appear. Click [User Login Options] node in the left pane.
We use the following options:
See Security Settings for complete description of the options. For user registration page, you can select which fields to be included in the page. Click the [...] button in the [Fields] row.
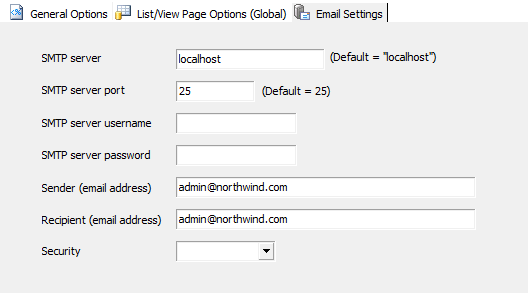
Click [>] to select the field or [>>] to select all fields to be included in registration page. Note that the password field is mandatory. Since we have chosen options that will send emails, the Email field must be included also. If you use User Level Security also, you should not include the User Level field because a new user is not supposed to choose his/her own User Level. If the User Level field is not included, the default User Level for new user will be 0 (Anonymous). You can assign a suitable User Level to the user later by logging in as an administrator. Alternatively, you can also set a default value for the User Level field in your database or in ASPMaker. Then the new user will get the default User Level immediately after registration. Click [OK] to finish. Note: If you have enabled any of the email sending features, you must enter the SMTP server information in the [ASP]->[Email Settings] tab:
See Email Settings in ASP Setup for details. 4. ASP Script Generation Click the [Generate] button and ASPMaker will generate the required ASP scripts automatically. 5. Running the ASP Application Run the generated scripts. In login page, the "Register" link and "Forgot Password" link are displayed.
Click the "Register" link, you will be redirected to the registration page. Note that a "Confirm Password" field and JavaScript validation are added automatically.
Click the "Forget Password" link, you will be redirected to the request password page.
If the email address entered by the user can be found in the user table, the password will be sent to the email address. After login, a "Change Password" link is added in the menu before "Logout". Click it and you'll be redirect to the change password page.
The contents of the email contents can also be modified in the template. The files are register.txt, changepwd.txt and forgotpwd.txt. For example, the forgot password email content template (forgotpwd.txt) is like the follows. The format is self-explanatory. Subject: Password Request The following special tags are used in the email templates: <!--$From--> is sender email address As for the email format, you can use either "TEXT" or "HTML". If you use HTML, change the line "Format: TEXT" to "Format: HTML" and enter HTML content below it. You can dynamically change the email by code using Email_Sending event before the email is sent. (See Server Events and Client Scripts)
|
| ©2001-2012 e.World Technology Ltd. All rights reserved. |