|
| Tutorial - Advanced Security - Dynamic User Level Security In this tutorial we will show you how to setup User Level Security in ASPMaker. We will use the demo database for demonstration. The demo database is a modified version of the Access demo database demo.mdb for better illustration. User Level There are 2 types of User Level security: 1. Static User Levels - the User Levels and the permissions are defined in the project and the User Levels are not to be changed after script generation. In this tutorial we use dynamic User Level Security. The "Employees" table and "Orders" table in the demo.mdb will be used in this example. Fields in Table "Employees"
Fields in Table "Orders"
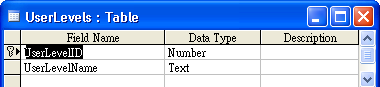
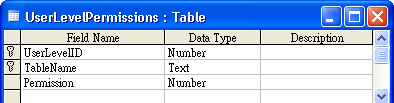
Dynamic User Level Security stores the User Level information in the database, so you need to add 2 tables to your database - User Level Table and User Level Permission Table which must have the following fields, note the data types, User Level ID and the Permission fields must be of integer type, the field names can be different though:
You can create these 2 tables in the database yourself or you can use ASPMaker to create these 2 tables for you, please see below.
Steps to Setup Advanced Security 1. Loading ASPMaker Open ASPMaker and connect to the demo.mdb database. 2. Setting up User Access Levels Click on the [Security] tab, there are two sections for the login process: Administrator Login Use Existing Table
To set up the user levels, click on the [Advanced] button. A popup window will appear. Click on the [User Levels] button. Select the User Level Field.
To use dynamic User Levels, switch to the [Dynamic User Levels] and check [Enable Dynamic User Levels].
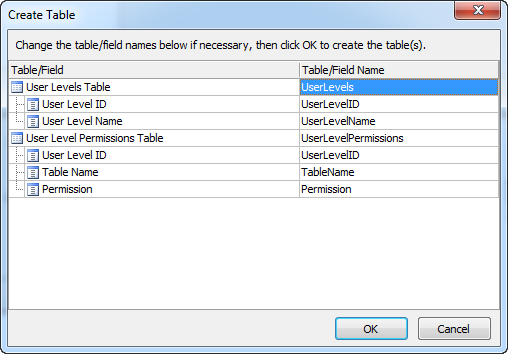
If you want ASPMaker to create these 2 tables in your database, click the [Create tables] button, the following form will display for you to change the table/field names if necessary. You can change the table/field names and then click OK to continue.
If you have projects created by previous versions of ASPMaker you may want to use dynamic User Levels and migrate the previously defined static User Levels in the project to the database. After selecting or creating the User Level and User Level Permission tables/fields, just click the [Migrate] button to let ASPMaker do that for you. You'll need to specify the User Level Table and the User Level Permission Table and the related fields. (If you use ASPMaker to create the tables, ASPMaker will set up the tables/fields automatically also.) User Level Table - the table for storing the User Levels A typical User Level Table should contain data like this:
Note that there are two built-in user levels:
You can add your own User Levels with User Level ID starting from 1. User Level Permission Table - the table for storing the permission of the User Levels A typical User Level Permission Table should contain data like this: Click OK to close the Advanced Security Setup form. If you go to Field Setup Page now and view the Edit Tag for the User Level Field, you should see that the Edit Tag has been setup as "SELECT" and the User Level table has been setup as lookup table automatically:
3. ASP Script Generation Click the [Generate] button and ASPMaker will generate the required ASP scripts automatically. 4. Running the ASP Application Login as Administrator, go to the List page of the User Level table and add some user levels.
. Note: If the User Level table is not created by ASPMaker, you may not have the Administrator and Default User Level in the table yet. You'll need to add them yourself. In this example, we add 2 more user levels - Sales and Manager, click the Add link and enter the User Level ID, User Level name and default permissions as follows:
Click "Add" button to confirm. If you click the "Permission" link now, you can set refine the permission for different tables/views:
Similarly, add the "Manager" User Level.
To assign different user level for the users, go to the user table (the "Employees" table in this case). You'll find that the Edit Tag of the User Level Field is setup as "SELECT" (combobox) and the combobox is populated with the user levels we defined above automatically.
We assign a password and the user level "Sales" to the employee #1 (the employee with EmployeeID equals 1). Then we logout. To see the Advanced Security works, we login again as employee #1 using "nancy" as user name and "1234" as password. According to the user level defined by us, users with "Sales"
level has view and add permissions to the "Orders" table only.
They are not allowed to update or delete records. Employee #1 belongs
to the "Sales" level, so we do not see the links to the edit/delete
page.
Notes:
Also see: Advanced Security - User ID Security
|
| ©2001-2012 e.World Technology Ltd. All rights reserved. |