Tools
Click [Tools] in the main menu bar to access the following useful tools available in PHP Report Maker.
Synchronization
Languages
Multi-Language Property Editor
Extensions
Advanced Settings
Copy Table Settings
Copy Field Settings
Sort Tables Alphabetically
Delete Template Cache
Compatibility Properties
Menu Editor
Synchronization
During the course of project development,
it is common that you have altered your database schema. To save the effort of doing the customization
from scratch again, PHP Report Maker provides you with the ability to synchronize your
project data with the database. The synchronization
process can be invoked in the following situations:
1. When working in PHP Report Maker
Simply click [Tools]->[Synchronize]
or click the button on the toolbar to perform the synchronization. PHP Report Maker will check automatically to see if
the database schema has been altered. If there are changes, you will
be prompted whether or not to proceed with the synchronization. button on the toolbar to perform the synchronization. PHP Report Maker will check automatically to see if
the database schema has been altered. If there are changes, you will
be prompted whether or not to proceed with the synchronization.
2. When opening a project file
When open a project file, PHP Report Maker
will automatically check the database to see if the schema has been altered.
You will be prompted to keep or update to the new schema.
Note: If the database contains a large number of tables/fields, this auto-synchronization feature may make reloading a project file slow. In that case you can disable this feature by unchecking [Tool]->[Auto Synchronize].
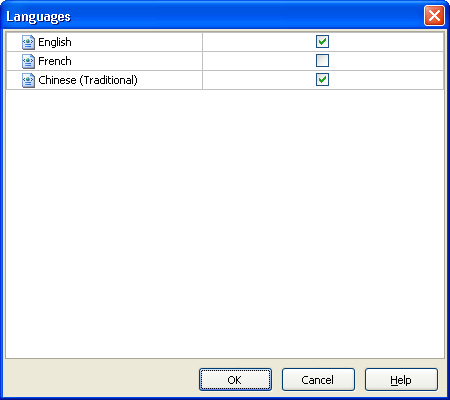
Languages
If you want to use multi-language project, make sure you have enabled Mulit-Language in the [PHP]->[General] tab (see PHP Settings), then click [Tools] -> [Languages] to select the languages you want to use in the project. If more than one language is selected, a combobox will appear on the top of the generated scripts for user to select language.
After selecting the languages, select a Default Language in the [PHP]->[General] tab (see PHP Settings).
Language files are placed in the subfolder "languages" under the installed folder.
Note: Only the English language file is provided by our products, you'll need to prepare the language files for other languages yourself. You may also check our website and see if there are any user submitted language files. If you want to share your language files with others (without any conditions), you can submit your language file to us too.
To translate a language, duplicate the shipped english.xml and rename it, it is recommended that the file name should contain alphanumeric characters (and underscore) and in lowercase only.
Open the new XML file with any text or XML editor, you'll see the root node:
<ew-language date="2010/01/05" version="7.0.0" id="en" name="English" desc="English" author="e.World Technology Ltd.">
You must change at least the id, name and desc attributes.
The id is an arbitrary identifier for identifying the language in generated scripts, it must be unique. The should contain alphanumeric characters only.
The name is for displaying the language name in the user interface (which does not support unicode), it should contain alphanumeric characters, underscore and spaces only.
The desc is for displaying the language name in generated scripts, it can be in the encoding of the XML file.
For example, if you want to make language file for Traditional Chinese, you may rename the file as chinese.xml and modify the node as:
<ew-language date="2010/06/28" version="4.0.0" id="cht" name="Traditional Chinese" desc="繁體中文" author="e.World Technology Ltd.">
Then translate the phrases in the file.
To translate table/field/menu captions and other properties supporting unicode, see Unicode Property Editor below.
Important Notes:
- Multi-Language project must use utf-8 for everything. The charset of the project must be "utf-8".
- The data in your database must be stored in unicode, otherwise your data will not be displayed properly.
- If you have to customize the template and put unicode characters directly in the template instead of using language file, always use utf-8 encoding and enable the Advanced Setting UTF-8 output files (see Customizing Template and Tools).
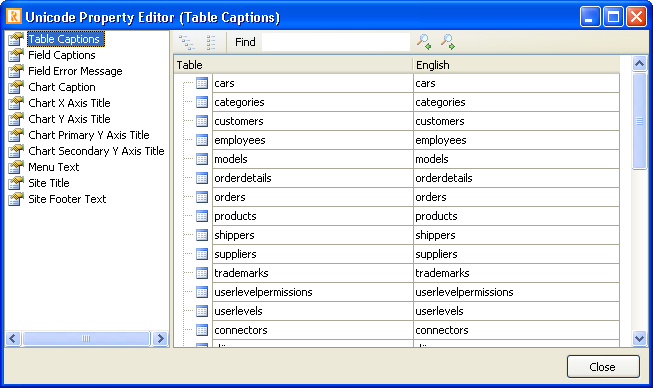
Multi-language Property Editor
Note: If you use single language, you do not need to use this editor at all. If you use Multi-Language (see PHP Settings) , you should always use Unicode Property Editor for above properties. It is the only place you can enter different values for different languages.
Some text properties support unicode input for multi-language project through Unicode Property Editor. Supported properties are:
- Table
- Field Captions
- Field Error Message
- Chart Caption
- Chart X Axis Title
- Chart Y Axis Title
- Chart Primary Y Axis Title
- Chart Secondary Y Axis Title
- Menu Text
- Site Title
- Footer Text
Note that if the Charset (see PHP Settings) of your project is not utf-8, the script will convert the properties to your charset, make sure the characters in your properties are supported by your charset. For example, if you use an unicode Euro dollar symbol in the caption but your project charset is iso-8859-1, the symbol still cannot be displayed in your web pages as iso-8859-1 does not support the symbol. In such cases you should use HTML character entities such as "€" in your caption.
Note: Once you use Unicode Property Editor to enter your unicode text, the unicode property values (in the Unicode Property Editor) will always be used prior to the original property values (in the general user interface) . The original property value will only be used if unicode property value of the language cannot be found. If you want to edit the property, always go back to the Unicode Property Editor.
To edit unicode properties, click [Tools] -> [Unicode Property Editor] to open the editor. Alternatively, you can also click the small button next to above properties in the user interface to open.
Select a property in the Property pane on the left, then enter your properties in unicode. For example, you can copy and paste from Word. Previously saved properties are displayed in bold font.
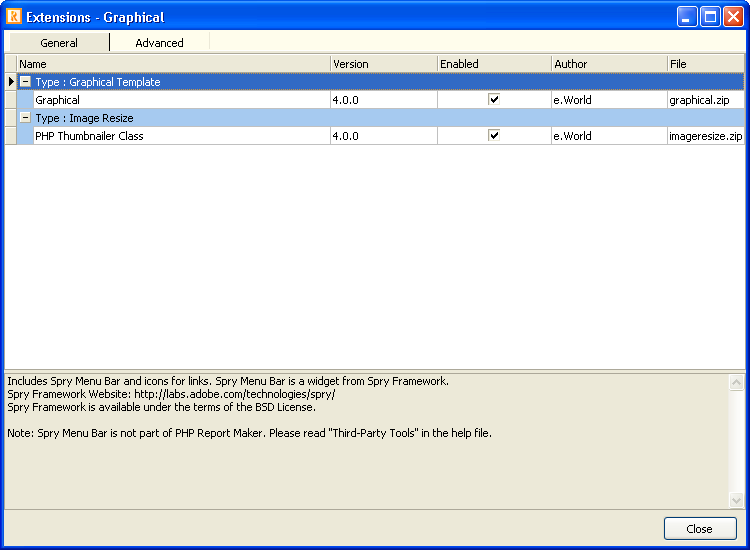
Extensions
Click [Tools]->[Extensions] to enable or disable these extensions. If the extension has advanced settings (NOT every extension has it), you'll see the [Advanced] tab after selecting the extension. Click the [Advanced] to configure advanced settings for the extension.
Advanced Settings
Advanced Settings are some advanced general settings for PHP Report Maker, or some rarely changed settings for the project, or custom defined settings for use during code generation. Click [Tools] -> [Advanced Settings] to change these settings:
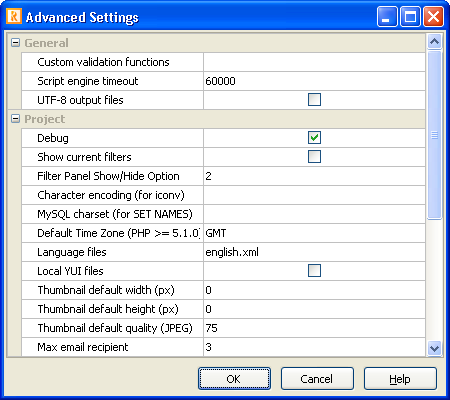
| General |
General settings for PHP Report Maker (for all projects) |
| Custom validation functions |
The comma separated function names for the Validate feature (see Field Setup)
You can add your own PHP/JavaScript functions for custom server/client-side validation. The function name is used for both PHP and JavaScript, so it must be a valid function name for both languages. You can put your server-side and client-side validation function in the Global Code (see Server Events and Client Scripts) section of server-side and client-side respectively. Alternatively, you can customize the template and put your JavaScript function in ewvalidator.js (which is JavaScript functions used for both server and client side) directly. However, in such case, you must make sure that your function can be used in both languages. |
| Script engine timeout (milliseconds) |
The Windows Script engine timeout period.
PHP Report Maker uses Windows Script to generate scripts dynamically, if you have a lot of tables or fields, the script engine may time out during generating a file and prompt you to cancel execution or continue. To avoid this problem, you can increase this timeout setting. For example, you can increase 60000 ms (one minute) at a time. |
| UTF-8 output files |
If enabled, the output file is in utf-8 encoding. Otherwise, it is ASCII by default.
The template files and output files are in ASCII encoding by default. Since the phrases are separated into XML language files in utf-8 encoding, ASCII encoding will suit most cases as the scripts contain code only. When you customize a template, it is recommended you use the language file also. If you have to put unicode characters directly in the template files, you must always use utf-8 and save the file in utf-8 encoding with the byte order mark (EF BB BF), and enable this setting to make the code generator output files in utf-8 encoding. |
| Project |
Settings for the current project only |
| Debug |
Show the SQL and runtime error for debugging. |
| Use DOM XML for Language object |
Use PHP 5 DOM XML to load language file instead of using PHP XML parser.
By default the scripts use PHP XML parser to load the language file for faster loading. If your PHP setup does not have PHP XML parser installed or you want to manipulate the loaded XML document by DOM XML, enable this setting. |
| Remove XSS |
Specify if sensitive keywords allowing XSS attack should be removed.
If enabled, all user input string will be checked against an array of sensitive keywords. If discovered, those keywords will be broken by inserting "<x>" to prevent XSS attack. If this behavior is unwanted, you can disable this feature at your own risks. Re-generate and re-upload the ewcfg*.php after changing this setting.
If you just want to allow some sensitive keywords, you can customize the array $EWRPT_XSS_ARRAY in rpt-config.php of the template. (Read Customizing Template.) |
| Show current filter |
Show current filter, for example, for debug |
| Filter panel show/hide option |
Show/Hide extended filter panel. Possible values are:
1 = always hide, 2 = always show, 3 = show when filtered |
| Character encoding (for iconv) |
Specify the encoding for iconv
Some features require conversion between your encoding and utf-8. If you use non English languages, you may need to set character encoding for these features. By default PHP Report Maker will setup the encoding automatically based on your project's Charset setting. If that is incorrect, you can specify yours. Make sure either iconv functions or multibyte string functions are enabled and your encoding is supported. See PHP manual for details. |
| MySQL charset (for SET NAMES) |
Specify the charset for MySQL SET NAMES statement.
If actually charset encoding of your data is different from the charset of your project, you may need to specify this setting for MySQL to convert between them. Read http://dev.mysql.com/doc/refman/5.0/en/charset-connection.html before using this setting. |
| Language files |
Default language files (comma separated) |
| Local YUI files |
Use local YUI files.
If disabled, online YUI files on http://yui.yahooapis.com/ will be used so there is no need to upload those files to your web server. However, in some cases (e.g. you work offline or you use SSL), you may want to use local YUI files. Enable this setting local YUI files will be generated, remember to upload the "yui<version>" subfolder. |
| Thumbnail default width (px) |
For use with extension for image resize. (see Third-party Tools.)
If a target resize width is <= 0, this default width will be used. If this setting is also 0, the width will be auto-adjusted to keep the aspect ratio. |
| Thumbnail default height (px) |
For use with extension for image resize. (see Third-party Tools.)
If a target height width is <= 0, this default height will be used. If this setting is also 0, the height will be auto-adjusted to keep the aspect ratio. |
| Thumbnail default quality (JPEG) |
For use with extension for image resize. Support JPEG only. (see Third-party Tools.)
Valid values are: 0-100 (Default is 75) |
| Email |
Settings for Export (Email) only |
| Max email recipient |
To avoid abusing the export to email feature, the number of email addresses in the recipient field is limited to the specified value. Default is 3. |
| Max email sent count per session |
To avoid abusing the export to email feature, the number of emails can be sent by the user in each session is limited to the specified value. Default is 3. |
| Max email sent period |
To avoid abusing the export to email feature, the number of email within a period of time is limited to the specified value. The unit is minutes. Default value is 20.
Note: Write email log (see below) must be enabled for this to work. |
| Use JavaScript (HTML 5) chart for email |
Specify if the charts should be sent as JavaScript (HTML 5) charts instead of Flash charts. For use with FusionCharts extension (for registered users only).
When exporting a report to email, if it is sent as HTML and it contains charts, by default JavaScript chart will be exported instead of Flash charts, Otherwise, when the recipient opens the exported report in the email attachment, a Flash player security warning message may prompt. |
| Write email log |
Specify if the email sent should be logged. |
| Email log field size limit |
Specify the general size for all fields (see below) to be logged.
If you don't need to log everything, you may want to log the first nth characters for each field only. Enter the maximum number of characters for all fields, including the "..." appended to the end. |
| Write email log to database |
By default the log is written to a daily log file in the specified File folder (see PHP Setup), if you want to log to a database table, enable this setting and the table name and field names below. |
| Email log table name |
Table name of the email log table. |
| Email log DateTime field name |
Datetime field for logging the date and time of email sent. |
| Email log IP field name |
String field for logging IP of the sender. |
| Email log Sender field name |
String field for logging email address of the sender. |
| Email log Recipient field name |
String field for logging email address of the recipients. |
| Email log Subject field name |
String field for logging subject of the emails. |
| Email log Message field name |
String field for logging the message of the emails. |
The settings are defined in the settings.xml located at the "src" folder. If you are an advanced user who customize templates, you can also add your own settings to the "Project" section. Open the settings.xml with a text or XML editor, add a <setting> node under the "Project" section. Make sure you provide an unique id to the setting. Supported data type is "String", "Integer" and "Boolean". If not specified, default is "String". The setting value can be retrieved in the template during code generation (note: NOT during runtime of the generated script) using the PROJ.GetV(id) method. Also read Template Tags and Template Object Properties.
Copy Table Settings
If you use database built-in query/view to make an alternate version of a table, you need to set up the table and field settings again, this tool help you quickly copies table and field settings from the source table to the view. Click [Tools] -> [Copy Table Settings] to open the following form:
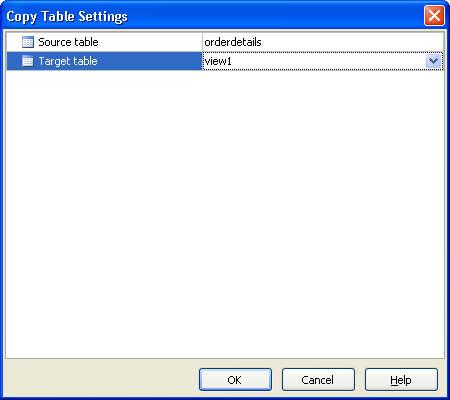
Select the [Source table] and the [Target table] (e.g. the query/view), click OK to copy the table settings. If a field in the target table has the same name as that in the source table, field settings will also be copied.
Note: This feature copies setting wtihout validation. If settings from the source table/field are not applicable to the target table/field, errors may result. Check the settings after copying.
Copy Field Settings
When you create a Custom View, PHP Report Maker allows you to copy field settings from the source table. However, when database built-in query/view is used, you need to set up the field settings again, this tool help you quickly copies field settings from the source table to the view. Click [Tools] -> [Copy Field Settings] to open the following form:

Select the [Source table] and the [Target table] (e.g. the query/view), the fields of the target table will be listed in the left column, you can then select the respective source fields (from the specified source table) in the right column and click OK to copy the field settings.
Note: This feature copies setting wtihout validation. If settings from the source field are not applicable to the target field, errors may result. Check the settings after copying.
Sort Tables Alphabetically
If you prefer to have the table list displayed in the user interface in alphabetical order, click [Tools] -> [Sort Tables Alphabetically] to do so.
Notes:
- Re-arranging the table display order by drag-and-drop in the Table Setup page is still supported, so the display order will NOT be re-sorted automatically after synchronizing the project with your database even there are new tables added to the database. Use this tool to sort again if necessary.
- Only tables are sorted, the display order of the fields in the user interface or in the generated scripts will NOT be affected by this tool.
- The display order of the menu items in the generated scripts is still controlled by the Menu Editor, using this tool will NOT affect the menu items.
Delete Template Cache
PHP Report Maker will reuse the pre-processed template scripts to speed up code-generation. We refer to these pre-processed scripts as "template cache", sometimes these template cache may become corrupted resulting from, for example, generating with a corrupted template or badly customized template. In these cases you may want to delete bad template cache and let PHP Report Maker builds the template cache again. You can do so by either clicking [Tools] -> [Delete Template Cache]
or by manually removing the folder for the template under your Documents folder, i.e. <Documents Folder>\PHP Report Maker\Templates\<TemplateName>.zip\. (Also see Customizing Template.)
Compatibility Properties
See Compatibility Properties Setup.
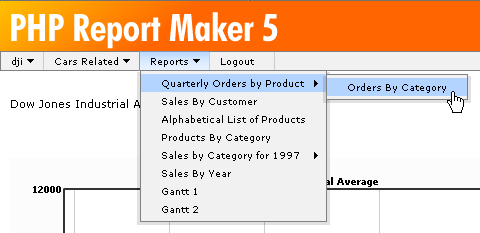
Menu Editor
PHP Report Maker allow you to modify the menu in the generated site, to open the menu editor, click [Tools] -> [Menu Editor] in the main menu or click the "Menu Editor" icon in the toolbar.
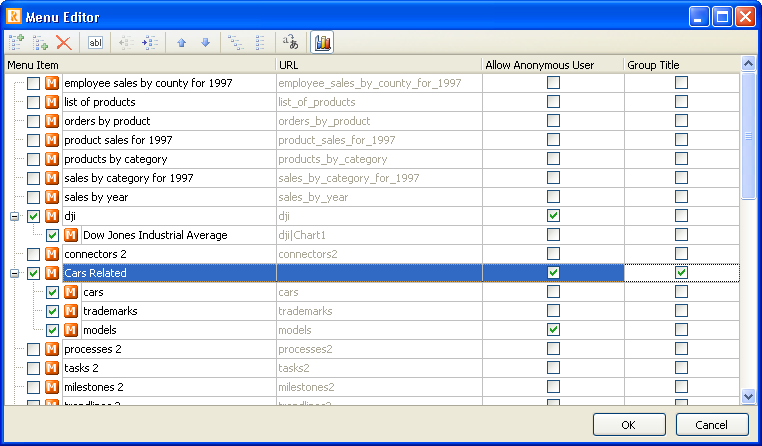
Use the following toolbar buttons to manage your menu items:
| Add item |
Add a new menu item
You can add new menu items and link them to your own URLs. Just click the button to add and then enter your URL. Note that the URL of the List pages of the tables are uneditable, they will be generated by PHP Report Maker automatically. |
| Add child item |
Add a child menu item to the focused menu item
You can also easily drag-and-drop the icon of a menu item to another menu item to create child menu items. |
| Delete |
Delete the focused menu item |
| Edit item |
Edit the displayed text of the focused menu item. You can also click the text directly to edit. |
| Post |
Post the changes you make to the focused menu item. |
| Cancel |
Cancel the changes you make to the focused menu item. |
| Refresh |
Refresh the menu items |
| Move up one level |
Move the focused menu item up one level |
| Move down one level |
Move the focused menu item down one level |
| Move Up |
Move the menu item up |
| Move Down |
Move the menu item down |
| Expand all items |
Expanse all menu items so all menu items of each level are shown |
| Collapse all items |
Collapse all menu items so only menu items of the first level are shown |
| Import items from PHP Report Maker project |
Import menu items from PHP Repot Maker project |
| Delete imported menu items |
Delete imported menu items |
| Multi-Language |
Show Unicode Property Editor for editing unicode menu text |
| Chart menu items |
Show/hide the menu items for charts |
Your can show/hide the menu items by checking/unchecking the checkboxes beside the menu item text. If a parent menu item is hidden, all the child items will also be hidden.
If you want to use special characters in the menu caption, use HTML entities such as "&#euro;", or you can enter unicode caption using Unicode Property Editor, see Unicode Property Editor above.
If your custom menu items requires login, uncheck [Allow Anonymous User]. For other (non custom) menu items, this setting is same as the List/Search/View permission for Anonymous User in Advanced Security. (See Security Settings.)
After modifying, make sure sure you click [OK] to save the changes.
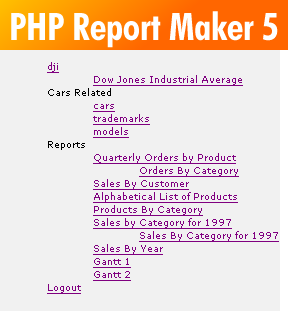
By default, the menu is vertical and menu items will be displayed using HTML <UL> and <LI> tags only.
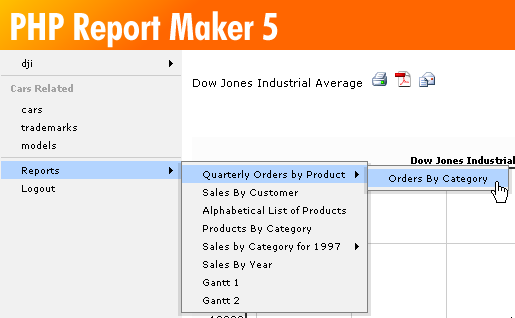
Registered user of PHP Report Maker can use the graphical extension and generate vertical/horizontal menus: (Click [Tools] -> [Extensions] to enable the graphical extension, then click [Advanced] tab to set the menu options.)
Vertical menu
|
Horizontal Menu
|
From PHP Report Maker 5, grouped menu items is supported. Grouped menu items are to be set up in the same way as a sub menu. You can check the title menu item in the Group Title column of the Menu Editor.
Note: Since grouped menu items is only supported in a vertical menu, if you use horizontal menu, you can only use it in sub menus (which are vertical), you cannot use it in the first level of the menu (which is horizontal).
|
